Tuesday, March 15, 2011

Hello??? Are you still there??

I know, I know...I have been kinda "off the map" lately...Well, let's see...It all started with my princess receiving the "Flu" as present from one of her classmates (seriously, it lasted almost a whole week!), then softball started (I am lucky enough to be the princess' T-Ball coach!!), then the horrible disaster in Japan (favorite channels have changed from HGTV to CNN), and lastly the little princesses school project (yep, you guessed it! We have to make a leprechaun trap)...And, well there you have it...LIFE, it happened.

Anywho, even with all this, I still have a few projects in the works and hoping to post the finished products within the next week...OK, so I guess now I HAVE to post them since I just gave them a time line!

1st - Finishing the living room.  Some of my family recently were in Hawaii (of course during the tsunami), and I am waiting for them to get back to finish off the final touches, then the BIG reveal!!

2nd - The Front Porch.  Almost done...I am making some pillows for the bench that is on the porch and then maybe a moss monogram (like the one pictured below) to go above the bench.
Live Moss Letters
(image from Pottery Barn)

3rd - The Patio.  I almost have it completed, but I need to clear out an old, ugly filing cabinet (of course, I have been saying this for MONTHS!) and then I can add just a few finishing touches and it too will be done.

4th  - Our Bedroom.  All I really need is to actually make my new headboard (which I almost have all the supplies for) and it will basically be done :)


5th - Lunch Bags for the Diva and Princess.  I have been asking both girls to bring home their Capri Sun packs so I can use them to make their new lunch bags.  This is a very slow process since it seems that only 1 of 2 come home each day.  Of course, I guess I could just buy a box of Capri Suns for $3 and dump all the juice out, but really...where is the fun in that???


So basically I have started a LOT of room makeovers/crafts in the house and then while the princess was sick, I got sidetrack in blogland and started a gazillion (yes, gazillion) other projects, and still haven't officially completed a single one.

Well, it time to hang up my "Super Procrastinator" cape and get to work!!  Awesome stuff to come...I promise!!

Jennifer :)

Friday, March 4, 2011

Living Room Update

So I've been working on my living room for quite some while now.  My mom laughs because she asked if I'm going to be redecorating it on a weekly basis (hee hee, maybe!).  Anywho, have been having a tough time with it.  So, here is a sneak peak at what's been brewing.
It started off with this awesome Craigslist find (Please ignore the bizarre wicker lamp hanging in the middle...it was replace with something much better)


I know what your thinking...What in the world are you gonna do with that!?!  Well, at least that is what the Mr. was thinking.  It was only $60 and the seller offered to deliver it...Score, right!!!

So I painted it (still using the left over paint from the dining room), gave it some new hardware and lined the whole inside with this awesome shelf paper...Perfect!  It's a desk/craft station all in one!!!  So awesome and perfect since I've let the Mr. keep his man cave even though I would love to have an office/craft room (OK, maybe more a craft room than office) but this new cabinet is perfect!


After this I promised the Mr. that this was the last furniture project and that I wouldn't be turning our living/dining room into a garage anymore.  BUT, then I found this set on craigslist!

A whole set, 2 side tables and a coffee table!  The best part is they all have storage...Extra blankets to cuddle with, pillows, and board games all easily accessible right in the living room!  The problem is that they would need to be painted....Oops!  There goes that promise I previously made ;)

Ahh, beautiful!

And did I tell you that that the coffee table is a lift top???  What a bargain!!!  Now the Mr. and I can have date night in front of the TV!  Every man's dream, right?? (Kidding...he is much better than that)


On this set I did decide to keep all the original hardware which is where the spray paint came in handy...Love spray paint!!


OK, so that's the major furniture pieces.  Next, I have to figure out how to blend my surfboard that hangs on the wall in the living room (again, more needs for a garage!) with the rest of the living room.  So...drum roll please....Here is my sneak peak


Cute, right!!!  I can't wait to show you the rest, but I have a few finishing touches to add...Stay tuned for the big reveal!

Jennifer :)


Wednesday, March 2, 2011

Houseplant Bowls

I needed to add some greenery to my living room so out came the pottery barn catalog to get some ideas...I absolutely LOVE the way these little plants look!  Not too tall and not too big...The perfect size!


Using the above picture as my inspiration I came up with these (Don't worry, the plant sticks are now removed...Oops!)


How did I make them....Well, that was the easiest part.  In fact, I spent more time googling different ideas then I actually spent making them. 

First I started out with a couple of small house ferns that I picked up at Home Depot for about $2 a piece

Then I went over to Michaels and found these cute little bowls for only $2.99


While I like the size of the bowl with the plant, I didn't like the way the plastic container looked.  My options were to buy potting soil and re-plant the plants in the bowls, or figure out a way to hide them...Since I didn't want to deal with the dirt mess, I decided to cover them up.  I dug through my craft box and found a bag of shells that my girls and I collected at the beach a few years ago and also a little baggy of river rocks.  That settled it!  I picked up one of the bowls, put the plant in the pot inside, and started shoving shells and rocks all along the sides of the pot until it was completely covered.  So easy and sooo cheap!  Total cost was under $6 each!  How awesome is that !!!!

Jennifer :) 

Wednesday, February 23, 2011

So many projects...so little time....


I have so many projects that I want to finish and I just haven't had the time to start them.  I had no idea becoming the Taxi driver for my girls could consume so much of my evenings!  Anyways, below are some projects I plan on finishing in the next month.

This AWESOME lamp shade from Mama Says Sew


And this beautiful headboard from !Cheap Like A Birdie!
IMG_3015CLBsig

Redoing my kitchen barstools to something similar to these from Talking Dollars and Sense


And I still love these book bundles from Christina's Adventures
 

And these decor balls from House of Hepworths
DSCN0034

Obviously there is A LOT of amazing ideas out there but these are a few of my favorites and are definetly on my To Do List!  Time to get crafting!!!!

Jennifer :)

Tuesday, February 22, 2011

Dining Room Makeover

My dining room table was a hand-me-down from my Dad's house.  At the time all I really wanted was the hutch to house my HUGE collection of Disney snowglobes (I know, not the traditional way of using a china hutch, but I always thought of it as more of an oversized curio cabinet! LOL)  Anywho, the hutch and table were honey oak color that was screaming 1984 and not really my thing, but served a purpose...until I started watching HGTV (love that channel).  I saw them paint a dining room table and thought "Hey, I can do that!"

Only one major problem stood in the way, sanding!  What!  Sanding...I don't want to have to sand all of this to be able to paint it!  Not to mention we don't have a garage which meant this all needed to be done in the house.  Of course, that night I was on a mission to figure out how to re-do my 1984 dining set without sanding.  After a few hours of research I fell in love with this site.  Chris's inspiration was AMAZING!!  Love, love, love it!!!  And the best part was NO SANDING!!!

Unfortunately, I didn't take a picture of the way the dining room set looked before, but I did take quite of few of the process.  Since we don't have a garage (hint, hint honey...I NEED a garage!) all of this had to be done where else, but the middle of the dining room.  Of course the Mr. thought I had lost my mind and had forwarned me that if it came out like crap we were not going out and buying a new dining room set (I failed to mention that we were hosting Monday Night Football at our house that Monday and I had this crazy idea on Thursday).  Me, being the over confident one, set out on the mission  never looking back!

So our dining room was transformed to this:
Keep in mind that the only entrance to our kitchen is on the left hand side of this photo...Needless to say, the kids and I dined on McDonalds, doughnuts and PB&J's all weekend since we not only didn't have a place to eat but also no easy entrance to the kitchen (I know, I'm bound to win Mom of the Year award for that! LOL).

Then to this (you can kind of see a pic the "before" hutch on the right):

And this:

To finally this :)

Of course, I hadn't had my tablescape done yet, but this was good enough to have the guys over.  Later I decided I hated the backs of the chairs staying the oak color so I painted them as well.  Also when I did my tablescape, I decided that the antique brass pulls didn't work and I later switched them out to black round knobs.

I followed the directions exactly in Chris's post at Just a Girl and everything worked out perfectly!  The only thing I would add is that the paint has to cure about a good week or two before it will become resistant to dings.  I still think the key was in the primer.  I will never change from Zissner's Cover and Stain...Plus now I am a huge fan of the Benjamin Moore paint.  Worth every cent eventhough I had to call 4 different paint stores to find it and finally De Vaul paints in Santa Ana pulled through (yeah, that was fun trying to explain to the Mr. why I needed to go all the way to Santa Ana to buy paint when Ace hardware is across the street!)...Only took 2 coats to cover everything keeping in mind I used the cheap foam brushes from Wal-mart and a foam roller).

Total cost for the project:
Primer - $8
Paint - around $40 (I bought 2 cans because I wanted to make sure I didn't run out!)
Hardware - $30 from Lowes
Brushes and Roller - $10 (I bought a few extra roller brushes to switch in between coats)
Chair covers - $20 on clearance at JoAnns!  I still have a few yards of extra!!

Total cost $118!!! 
What a bargain for a whole new dining room set!!!  Plus I had extra paint, primer, and brushes for future projects :)  And yeah, the Mr. was very impressed with the final outcome ;)

Monday, February 21, 2011

No Mantle....That means a Holiday Tablescape!

After reading so many different blogs about these amazing mantles that everyone decorates for the different holidays, I was really upset that we do NOT have a mantle.  What is one to do without a mantle??  Decorate your dining room table!

This was my before table....Never liked it, but it was functional


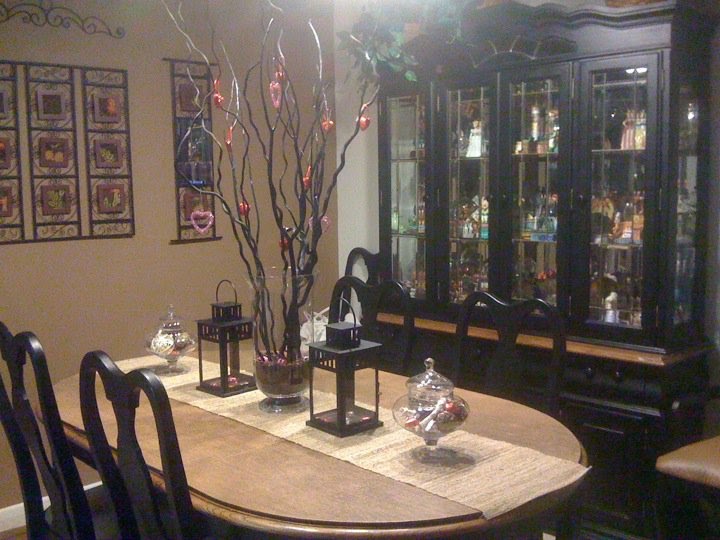
There were 2 main things that came to thought when I decided to do this....First, it had to be CHEAP and it had to be interchangable.  And then my transformed my table into this:

The most expensive piece on this table is the runner...BIG splurge at Target for $17 (Later, I realized I could have cut a piece of burlap and got the same effect)!  A breakdown of the pieces are as follows:
  • Runner - $17
  • Lanterns - $7 each
  • Apothecary jars - $6 each
  • Large Vase - $5 (a clearance bargain!)
  • Branches - $7
  • Vase fillers - $12 (combination of coffee beans from Trader Joes and vase filler from Ikea)
GRAND TOTAL - $67

I know that sounds expensive but I am able to switch out the decor every month to match the holiday for under $5 using the dollar aisles at Target and Michaels...To me that is money well spent!

The above picture was for Valentines Day...Below is what I have done for St. Patricks Day

I love it!!!


So many options....hmmmmm


All in all, I absolutely love it and it isn't overkill...Which is good otherwise I don't think I would have had the Mr. on board for this project! 

Stay tuned, I'll post more soon!!!

Jennifer :)